Overview

I built an arduino project that monitor’s Facebook online status (the chat app in the lower right when you are on the facebook page). It lights up bright when someone is Online, dimly lit when idle and is unlit when someone is offline. I wired 3 LEDs so it can only monitor 3 people as of right now. It won’t tell you who is who because there’s no text display. I suppose you could make little stickers. In the end, it’s a simple little project that provides a benefit of being able to have a small secondary display of who’s on and not. Is the little device a keeper? Would people want it? Probably not. This was a test.
It was a fun little project but it had a lot of challenges. First, this is an online app with dependancies on online resources. I read forums and wikis and saw that much has changed lately with Facebook’s API. So this is an article about how I got it working but doesn’t mean that it’s going to work for you. Things change online and at best this might be a starting point in how to “get your arduino online”. When things change online, this article can get dated.
And about that online bit. The arduino is just a simple microprocessor. I found that a lot of fancy Java features won’t run on it. Strings, System.arraycopy and many network Java packages just aren’t supported. So you’re going to need a laptop or computer hooked up to the arduino to make this work. The arduino doesn’t have a direct network adapter on it, a network stack or a lot of RAM. It’s job is to do the simple stuff like blink LEDs. So I found it’s best to keep the arduino code simple.
Two apps run. One is the Processing app which connects to Facebook and queries 3 facebook IDs for their status. One is an Arduino app that simply loads the code onto the Arduino. The Processing app has to stay open because it queries every 10 seconds and sends special codes to the Arduino. The codes may look like this: ` #0FF = 1st LED full brightness, 1st friend is online #110 = 2nd LED dimly lit, 2nd friend is idle #000 = 1st LED off, 1st friend went offline #2FF = 3rd LED full brightness, 3rd friend came online ` The first character, #, is just a marker. The next character tells the arduino which LED to light up (starts with 0), The next two characters is a hexadecimal number telling how bright to light up the light 0-255. So the Processing app queries Facebook and sends a code over serial to the Arduino. The Arduino parses the code and changes the LEDs.
Dependencies
There are a ton of dependencies that you’re going to need.
- Facebook account
- A dummy app on facebook, instructions below.
- An infinite session key (also called offline access). This allows you to create a desktop app that doesn’t have to be in a web container (nor prompt for a facebook login).
- An arduino and some simple electronics components. I ordered a starter kit from Amazon for $40.
- Processing
- The arduino IDE
- A facebook java API from google code. It has some dependancies that should be covered by the below steps.
Wiring the arduino

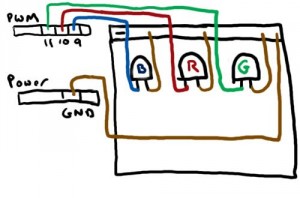
If you mess with the arduino a lot, it shouldn’t be a problem to wire 3 LEDs. But I’ll try my best with my non EE background and crappy drawing skills. The longer lead on the LED is the + side (the signal) and the shorter is the ground. Put your LEDs anywhere on your breadboard, + on the left. Run 3 signal wires to your breadboard and connect them to the + side (the left). Each LED needs to be grounded. I used a common ground along the top (the - symbol at the top left of the above diagram). I didn’t use the common + on the breadboard because each LED needs to light up independently.

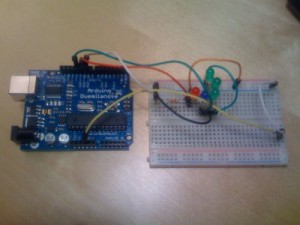
This is the basic approach I took wiring mine. Now, my green LEDs are weak so I added a few to make it brighter. My blue LED is blinding so I added a resistor in the lead to it (still is too bright). It’s pretty messy in there.
Arduino code
int val = 0;
char buffer[7];
char oldBuffer[7];
int pointer = 0;
byte inByte = 0;

// define pins
int red = 10;
int green = 11;
int blue = 9;

byte r = 0;
byte g = 0;
byte b = 0;

void setup() {
  // set pinouts
  pinMode(red,OUTPUT);
  pinMode(green,OUTPUT);
  pinMode(blue,OUTPUT);

  // open serial port
  Serial.begin(9600);

  Serial.println("DONE WITH SETUP!");
}

void loop() {
  if (Serial.available() > 0) {
    // read incoming byte
    inByte = Serial.read();

    if (inByte =='#') {
      Serial.println("Got something with #");
      Serial.println(inByte, DEC);
      while (pointer < 3) {
        buffer[pointer] = Serial.read();
        pointer++;
        Serial.println(buffer[pointer], DEC);
      }
     if (buffer[0] == '0') {
      r = hex2dec(buffer[2]) + hex2dec(buffer[1]) * 16;
     }
     if (buffer[0] == '1') {
      g = hex2dec(buffer[2]) + hex2dec(buffer[1]) * 16;
     }
     if (buffer[0] == '2') {
      b = hex2dec(buffer[2]) + hex2dec(buffer[1]) * 16;
     }
    }

      analogWrite(red, r);
      analogWrite(green, g);
      analogWrite(blue, b);

      pointer = 0;
      }

      delay(100);
}

// convert on HEX characeter into decimal number
int hex2dec(byte c) {
  if (c >= '0' && c <= '9') {
    return c - '0';
  } else if (c >= 'A' && c <= 'F') {
    return c - 'A' + 10;
  }
}
Fire up the Arduino IDE and paste this in. Hit Command+U (or the menu equivalent) to upload the sketch to the board. Now click the serial monitoring button (it’s the one all the way to the right). This will let you send and receive serial messages. Try sending #0FF. The board should light up the first blue LED all the way to full brightness. Try #1FF and #2FF. If those work then you’re good to go.
Now comes the Facebook stuff. This part takes the longest. Sign into facebook (of course you have an account) and go to http://developer.facebook.com/. Create a new app, just follow the wizard steps (you can name it anything). Then write down your API_KEY and SECRET_KEY. They’ll be used quite a bit below.
First, we need to get an infinite session key from Facebook. I found some code online that gets part of the way there but it was extremely confusing as to what to do with it. It took me many hours to realize that what is returned by this class is the infinite session key.
Go to the main method below and change API_KEY, SECRET_KEY and AUTH_TOKEN_HERE. Compile this code with javac (or in Eclipse). Now run it. It will return a raw http response with a session element in it. It will be a long hash type value. Copy this, this is the infinite session key.
Infinite session key code
/*
 * Web Site: http://as-m-going-on.blogspot.com/2010/05/tiny-java-connector-for-facebook.html
 * Author: Prasanta Paul
 *----------------------------------------------
 *Command Line Option
 *-Dhttp.proxyHost=your.proxy.dom -Dhttp.proxyPort=XX
 *-----------------------------------------------
 * TODO: Write a wrapper for HTTP Post
 * TODO: XML Parser to parse API output
 */
package com.excoflare.facebook;

import java.io.BufferedReader;
import java.io.InputStreamReader;
import java.io.OutputStream;
import java.net.HttpURLConnection;
import java.net.URL;
import java.net.URLEncoder;
import java.security.MessageDigest;
import java.util.Arrays;
import java.util.Date;

public class FBAgent {
  private URL FB_URL = null;
  private String SECRET;

  private String apiReqParms[] = null;
  private int parmIndex = 0;

  public FBAgent(int numParms) {
    try {
      parmIndex = 0;
      apiReqParms = new String[numParms];
      FB_URL = new URL("http://api.facebook.com/restserver.php");
    } catch (Exception ex) {
      printLog("Error: " + ex.toString());
      ex.printStackTrace();
    }
  }

  public void setAPISecret(String secret) {
    this.SECRET = secret;
  }

  public void addAPIParm(String key, String value) {
    apiReqParms[parmIndex++] = (key + "=" + value).trim();
  }

  public void sendHTTPRequest() throws Exception {
    String reqParms = "";
    for (int i = 0; i < apiReqParms.length; i++) {
      reqParms += apiReqParms[i];
      reqParms += "&";
    }
    // Add Signature
    reqParms += "sig=" + genSig();
    printLog("Data to Reg=" + reqParms);
    if (FB_URL == null) {
      printLog("Empty URL....");
      return;
    }
    HttpURLConnection conn = (HttpURLConnection) FB_URL.openConnection();
    conn.setRequestMethod("POST");
    conn.setDoOutput(true);
    conn.setDoInput(true);
    conn.setRequestProperty("Content-Type",
        "application/x-www-form-urlencoded");
    conn.connect();

    // Send Request Parameters
    printLog("Sending Request Parameters...");
    OutputStream out = conn.getOutputStream();
    out.write(reqParms.getBytes());
    out.flush();

    printLog("Response Code=" + conn.getResponseCode());

    printLog("Get Response...");
    BufferedReader rd = new BufferedReader(new InputStreamReader(conn
        .getInputStream()));
    String line;
    StringBuffer outputData = new StringBuffer();
    while ((line = rd.readLine()) != null) {
      // Process line...
      outputData.append(line);
      printLog(line);
    }

    out.close();
    rd.close();

  }

  public String genSig() {
    try {
      // Sort Alphabetically
      Arrays.sort(apiReqParms, String.CASE_INSENSITIVE_ORDER);
      String reqParmsStr = "";

      // Concate
      for (int i = 0; i < apiReqParms.length; i++) {
        reqParmsStr += apiReqParms[i];
      }
      reqParmsStr += this.SECRET;
      printLog("Sig Input=" + reqParmsStr);
      // Get MD5 Hash
      MessageDigest md = MessageDigest.getInstance("MD5");
      md.update(reqParmsStr.getBytes());
      byte keyB[] = md.digest();
      printLog("Key=" + new String(keyB));
      printLog("Key-UTF=" + URLEncoder.encode(new String(keyB), "UTF-8"));
      return getHexCode(keyB);
    } catch (Exception ex) {
      printLog("Error in Generating Signature: " + ex.toString());
    }
    return "";
  }

  public String getHexCode(byte byteA[]) {
    byte dig = 0;
    char hexCode[] = { '0', '1', '2', '3', '4', '5', '6', '7', '8', '9',
        'a', 'b', 'c', 'd', 'e', 'f' };
    // Capital doesn't work
    String hexVal = "";
    byte msn, lsn;
    for (int i = 0; i < byteA.length; i++) {
      dig = byteA[i];
      msn = (byte) ((dig >> 4) & 0x0F);// Most Significant Nibble
      lsn = (byte) (dig & 0x0F);// Least Significant Nibble
      hexVal = hexVal + hexCode[msn] + hexCode[lsn];
    }
    return hexVal;
  }

  public void printLog(String msg) {
    System.out.println(msg);
  }

  public static void main(String args[]) {
    /*
     * -------------------------------------------- Auth.createToken
     * fb.addAPIParm("api_key", fb.API_KEY); fb.addAPIParm("method",
     * "auth.createToken"); fb.addAPIParm("v", "1.0");
     * --------------------------------------------
     */
    try {
      FBAgent fb = new FBAgent(4);
      fb.setAPISecret("SECRET_KEY_GOES_HERE");
      fb.addAPIParm("api_key", "API_KEY_GOES_HERE");
      // Get auth_token from http://www.facebook.com/code_gen.php?v=1.0&api_key=API_KEY
      fb.addAPIParm("auth_token", "AUTH_TOKEN_HERE");
      fb.addAPIParm("method", "auth.getSession");
      fb.addAPIParm("v", "1.0");
      fb.sendHTTPRequest();
    } catch (Exception ex) {
      System.out.println("Error:" + ex.toString());
      ex.printStackTrace();
    }
  }
}
Now take your API_KEY, SECRET and AUTH (infinite session key) and put them into the below Processing code. Also change the Serial.list()[2] line to be your serial port. On mac, you need to install the usb to serial driver included with the Arduino IDE folder.
Processing code
import processing.serial.*;

import com.google.code.facebookapi.*;
import org.json.*;

FacebookJsonRestClient facebook;

int interval = 10; // retrieve every 10 seconds
int lastTime;

// 3 Facebook IDs to watch
int[] ids = {  515470367,  // patton oswalt
               26670531942,  // mccoy tyner
              508305963}; // hugh mcleod

Serial port;

// Customize setup to fit your environment
void setup() {
  frameRate(10);

  String apiKey = "CHANGETHIS"; // your api key
  String secretKey = "CHANGETHIS"; // your secret
  String sessionKey = "CHANGETHIS";  // infinite session key goes here
  facebook = new FacebookJsonRestClient(apiKey,secretKey,sessionKey);

  //
  String arduinoPort = Serial.list()[2];
  port = new Serial(this, arduinoPort, 9600); // connect to Arduino

}

void draw() {
  int n = (interval - ((millis()-lastTime)/1000));

  if (n <= 0) {

    for (int i = 0; i <= 2; i++) {
      int uid = ids[i];
      String userStatus = fetchData(uid);

      /* light up arduino based on facebook status
         facebook API says:
         online_presence string  The user's Facebook Chat status. Returns a string,
         one of active, idle, offline, or error (when Facebook can't determine presence
         information on the server side). The query does not return the user's Facebook
         Chat status when that information is restricted for privacy reasons.
         */
      if (userStatus.equals("active")) {
        sendSerial("#" + i + "FF");
      }
      if (userStatus.equals("idle")) {
        sendSerial("#" + i + "10");
      }
      if (userStatus.equals("null")) {
        sendSerial("#" + i + "00");
      }
      if (userStatus.equals("offline")){
        sendSerial("#" + i + "00");
      }
      if (userStatus.equals("error")){
        sendSerial("#" + i + "00");
      }

    }

    lastTime = millis();

  }
}

String fetchData(int uid) {
      try {
        String query = "SELECT name FROM user WHERE uid=" + uid;
        JSONArray resultArray = (JSONArray)facebook.fql_query(query);
        JSONObject result = resultArray.getJSONObject(0);
        print("Querying online status of " + result.getString("name") + ": ");

        query = "SELECT online_presence FROM user WHERE uid=" + uid;
        resultArray = (JSONArray)facebook.fql_query(query);
        result = resultArray.getJSONObject(0);
        String userStatus = result.getString("online_presence");
        println(userStatus);
        return userStatus;

} catch (Exception jex) {
  jex.printStackTrace();
}
return "";
}

void sendSerial(String message) {
  port.write(message);
}
Save this sketch but don’t run it yet. We’re missing some libraries.
Libraries for the facebook java lib need to go under: ~/Documents/Processing/libraries/facebook/library. I had the following jars in that folder. The json jar ` activation-1.1.jar jaxb-api-2.1.jar commons-logging-1.1.1.jar jaxb-impl-2.1.3.jar facebook-java-api-schema-2.0.4.jar json-20070829.jar facebook.jar stax-api-1.0-2.jar `
All of these jars should come from the Google Code project I liked at the beginning of this post. After all these things are ready, get the arduino running and then run your Processing sketch.

It should pop up the default Processing window. There’s nothing sexy about this app. It has no GUI and writes simple status lines to the console. It will run until this window is closed. Every 10 seconds it should update the LEDs with the status from Facebook. I’ve found that the status isn’t always real-time. But it’s close enough for our purposes. You can change the IDs to monitor in the Processing code. The IDs can be found on Facebook by looking at someone’s profile. For example, Patton Oswalt’s profile page is http://www.facebook.com/profile.php?id=515470367. His ID is 515470367.
Conclusion
It was a fun little project. I’m glad I got it working in my time off from work. It took me about 6 hours straight and I was really in the zone at the end (1:15am). The facebook bits took me almost 4 hours just because of the lack of documentation about that freaking infinite session key. There are a lot of examples on the web on Java in a web container (or PHP) but very few desktop app examples.
Please let me know if you found this interesting, attempted it, ran into problems, have suggestions for improvements or anything else by leaving a comment.