Backstory
In my last job, I was a hourly contractor who had finished a project and was transitioning off to other things. By a chance of fortune, I had an opportunity to take some time off and do whatever. I had one week on, one week off for a period of over a month. I was extremely excited because I have a lot of hobbies that are bound by time and this was exactly what I wanted. Time to do whatever. I was curious to see whether I’d waste it or actually produce something. I’m happy to say that I did not waste the time I had and I produced the most intense gamedev learning experience I’ve ever had. By no means, am I claiming to be an expert. I’m just documenting a very large personal effort.
Ok, enough of all that personal crap. In reading game development community sites (like gamedev.net and idevgames.com), something that was a near cosmological constant is the post “OMG I wnt to make mmo, pls halp!”. It’s like a nuclear clock. Someone does some subscription revenue math, gets excited with dreams of being rich, tries to start something ridiculously complicated, gets stuck and runs to a forum looking for members or advice. On a forum like idevgames.com, there are exceptional members (who should be praised for their patience and humanity) that take the time to respond to this never-ending line of questioning. The most effective response is, “have you made tetris yet?”. Usually the person has not made a simple game and I doubt that they end up doing so. However, eventually this idea sunk in and I realized: I do not want to make an MMO but I should make Tetris. Because someday I might want to make something more complicated (not an MMO). So let’s do this.
The Plan
Firstly, I had been doing Java at my job for a while now and am fairly comfortable with it. Outside of this, I had been messing around with a project called Processing which makes graphics and generative art really easy. I knew this was going to be complicated so instead of diving into code, I made a plan first. I started breaking down what Tetris is and mapped out classes and responsibility. This planning bit I’ve always been bad at and I spent maybe a day thinking and writing down like “what a tetris piece is” and what minimal features there should be. The gameplay and design is already done and this fact is a big step compared to coming up with something by yourself.
For sure, the lesson I learned is: “it’s just a plan”. You can change it as you go and eventually it’s best to throw it away after things are sufficiently started. As the code grew, the plan was put away; which is good because my plan wasn’t really all that special or well organized. I had some ideas about pieces to be written and what the hard parts were but honestly the best lesson I learned was “it’s just a plan”. You’re not going to pre-write and pre-solve all the problems.
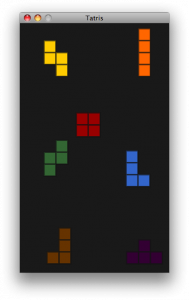
Next was research and learning. I studied other processing games (like [MonkeyPatrol}(http://lux.vu/blog/2005/01/06/monkey-patrol/) by Joshua Minor) and white papers from university CS classes. I played Quinn (a mac OSX clone) a bit. I knew a few things to start with. For example, game objects should draw themselves. There are 7 piece types (which look similar to the letters: I L O J S Z T) and many things are similar between them so I planned for a base Piece class and named the pieces after the letters they looked like (IPiece, LPiece, etc). I collected some screenshots of existing games to use as inspiration.
Drawing a Piece
Ok, I had my plan and similar stuff done. Ok, where to start? I like to start from the top down. IE: from the interface backwards. So I start with a graphical mockup and then make the mockup actually function. So started out with drawing. First, I created a Block class. This is a single square with an x,y,height,width,color etc. It’s a component of a Piece. Before going any further. I have to explain that I intentionally did not do Tetris the easy way. The easy way is having a bitmap style grid of blocks and simply moving the bits down and around. Then you just represent the bitmap with graphics. I did not do it this way because I wanted an excuse to do sorta a “2d model” where the piece is constructed from a central point, rotated etc more like what someone would do with a 3d model in a modern game. This single decision made things extremely complicated for me but it also made it a more useful learning experience for when I want to do something like a platformer or a shooter because these game types use collision detection in a 2d/3d space similar to how I did it. So a Piece consists of Blocks with a model describing the shape of the Piece. For example, an LPiece looks like this:
` 1 2 34 `
And the IPiece looks like this:
` 1 2 3 4 `
And the OPiece looks like this:
` 12 34 `
So I created all the Pieces and eventually had a test app that looked like this:
Next, let’s move on to piece movement.
Moving and Rotating a Piece
I wanted to implement these shapes very simply and have Processing handle the rotation for me. This did not work as I wanted it to. When I rotated a piece, it would actually rotate the graphics context so the whole screen would rotate and all the other pieces would get all screwy. So I had to do it myself. I created a local field called rotation and implemented basic Trigonometry to describe the angles and orientation of the blocks. Doing this, I had to assign a block as the pivot point. For example the LPiece starts with block 2, block 1 is 0 blocks left/right(x) and 1 block up/down(y). So I created a constant named blockSize (which is used everywhere so the game can scale). And the psuedocode to make LPiece looks something like this:
// this is just psuedocode.
block[0].x = cos(0 + rotation) * blockSize;  // x
block[0].y = sin(180 + rotation) * blockSize;  // y
At zero degrees rotation, cos(0+0) is 0 and sin(180+0) = 1, so block1 is above block2. Block4 is problematic because it’s outside of a circle so the rotational math is more difficult. I solved this by rounding (which is terrible) on blockSize. The block sorta snaps into place and it works all the time. I’d like to fix this someday.
Because this was taking me a while, I worked with LPiece by itself for a few days. Eventually I had the LPiece block moving, rotating and drawing. Next, I needed a gamefield so I could start on motion and the basic game loop of dropping a piece onto the bottom of the gamefield. So I created a few variables that described the gamefield and created drawing routines for a grid pattern that could be used for debugging. The grid looked nice so I kept it. After LPiece worked, I made all the other pieces work in a similar fashion. When the inheritance design was refactored and working right, maintaining all the pieces was quite easy because lots of code was being reused and most editing only needed to be done in one place.
Then I moved onto motion and interactivity. I used processing’s keyPressed() method to detect when a key was pressed and then called Piece.setRotation(90) if UP was pressed for example. The left arrow key (key code LEFT) was mapped to Piece.setX(Piece.getX() - blockSize). This worked for now and interactivity was done for now. Later the key presses will be delegated and less hard wired. But for now, there’s a proof of concept that works.
I had a test app that showed rotation of a simple piece:

The Game State
But now, I needed to set up the game architecture properly. What was a simple test needs to be more organized into New Game / Game Over / Paused and so on. I envisioned “scenes” from a play. Act I would be the intro screen, in Act II all the actors would shuffle off the stage and something else would happen. Unfortunately, this analogy was confusing and slightly misguided. I had been studying Monkey Patrol as mentioned above which was a fairly complicated game to be writing in Processing and I emailed the author. I told him that his structure had been making a lot of sense as I stared and studied it. He explained that it’s not “play scenes” but a pattern called The State Pattern where game states can be swapped out at will. This made a lot of sense. A game is a state machine that runs until exit. Game states are objects that by themselves make up things like a pause menu, a game over screen or the main game. The Game State is the metaphor that I needed instead of a scene. It is a scene but it’s actually the state of the game and this is key because of how new states are detected.
Firstly, I needed an interface. The interface for GameState would contain a few methods:
The most important one is nextState() which returns itself if we need to stay where we are and returns a new state for whatever’s next. For example, if the player has filled up the board we need to return a state of GameOver. If the player is not losing then return PlayState. The main class simply calls the nextState() method of the GameState interface and it doesn’t know where the game is, it’s just calling nextState() which every GameState is required to have because that’s how an interface works. Interfaces are really useful for abstracting away implementation and creating a boundry between inside and outside.
For example, the main game loop is PlayState. It’s when the game is playing. If the player presses ESC, the game pauses into the menu screen called MenuState. If the player loses, the game switches to GameOverState. It looks like this:
public GameState nextState() {
  if (inMenu == true) {
    inMenu = false;
    MenuState menuState = new MenuState();
    menuState.setNextState(this);
    menuState.setScreenshot(this);
    return menuState;
  }

  if (gameOver == true) {
    GameOverState gameOverState = new GameOverState();
    gameOverState.setScreenshot(this);
    return gameOverState;
  } else{
    return this;
  }
}
This code above is the gameState setting up the in-game menu if inMenu is true. Notice that it creates a new MenuState and then sets some local variables on that new object. setNextState() copies the current game into a local variable which is returned and played when the game is unpaused. The setScreenshot method is used to create the illusion of the game paused in the background of the menu text.
The game over screen follows a similar pattern except there’s no coming back or unpausing from game over. GameOverState creates a new game and displays a “sorry buddy” type message.
Collision Detection
Then I did collision detection. This meant checking for a few cases:
- A piece hits the left or right wall? Clamp to the game field.
- A piece rotates into the wall? Prevent the rotation.
- A piece hits the stationary tetris blocks (deadGrid[])? Piece sticks and then new piece.
- A piece rotates into the Dead Grid? Prevent the rotation.
- A piece moves left or right into the Dead Grid? Prevent the movement. So the active piece can rub up against the pile of blocks but only sticks if it falls down on one.
Developing these checks took a lot of time. It was an iterative process that turned out to be non trivial. I created a few methods that did the various checks. First, in PlayState:
// check for blocks on X, -1 is left, 1 is right
boolean gridCollideX(Block checkBlocks[], int direction) {

// check for blocks below current piece
boolean gridCollideY(Block checkBlocks[]) {
In my design, I could have created a DeadGrid object. This would represent the blocks that are done. Like, the blocks on the board that the player has dropped, the pile. The DeadGrid would then be responsible for doing a check to see if the current piece has hit itself. I chose not to do this just because. Creating a DeadGrid object would be much cleaner, but at this point the PlayState has the DeadGrid object represented as an array of blocks. So it’s implemented kind of simply now but this seems to work. A better design would be to move everything into a DeadGrid object or move everything into the Piece object. I might change this later.
So these above methods check collision. gridCollideX() is called everytime the player presses left/right (the X axis). gridCollideY() is called every time a player presses down or when the automatic timed downward movement of the piece happens (the Y axis). If it returns true, then the piece collided and some action is taken, else the move is allowed. That “some action is taken” depends on what part of the game called it. The piece could hit on the Y and that means it landed downward on the DeadGrid so it needs to freeze in place and be added to the grid. If a piece hits on the X then it just means it shouldn’t go through the DeadGrid so just prevent the movement. That way the piece appears to collide with the DeadGrid and blocks don’t go through each other. checkBlocks[] is an array of Block objects which usually make up the current piece. You have to check all 4 blocks in a piece to see if any of them have hit something.
In addition to these checks, a Piece does some collision detection by itself:
// checks to see if piece is near grid to prevent unneccessary checks
public boolean nearGrid(Block deadGrid[][],
  Point2d playField[], int gridSizeX, int gridSizeY)

// does common collision detection for all piece shapes
public boolean rotateCollideHit(Block deadGrid[][],
  int gridSizeX, int gridSizeY, float testOffsetX[],
  float testOffsetY[], Point2d playField[])

// superclass method, never used, to be overriden by piece subclasses
public boolean rotateCollide(Block deadGrid[][],
  Point2d playField[], int gridSizeX, int gridSizeY)
These checks involve the DeadGrid array. The Piece superclass handles nearGrid(). nearGrid() returns true is a piece is within 2 or so blocks of the DeadGrid. A piece can’t collide beyond that so this is an attempt at optimization. The Piece superclass also implements a rotateCollideHit() method which actually does the collision detection. This is confusing but it’s like this for a reason. Each piece has a different shape but eventually all the pieces do this rotateCollideHit() function. I put this in the superclass to employ code reuse. The testOffsetX[] and testOffsetY[] arrays are specific to the Piece’s shape, in other words, this is like the model of the piece. So rotateCollide() actually just returns false in the Piece superclass. It’s never used, it’s meant to be overridden.
Then there are some wall checks. The following methods in the Piece object check to see if the piece has gone off the screen. It’s pretty straight forward. If a piece’s X is greater than the wall width then clamp to width. The piece stays on the play field this way.
public boolean rotateCollideX(float wallStart, float wallWidth)

public boolean rotateCollideY(float roomStart, float roomWidth)

public boolean rotateCollideYHit(float roomStart, float roomWidth)
I didn’t include all the code for readability. It’s pretty simple, when these return true the piece doesn’t move. So the “clamping” makes the piece appear to stay on the screen.
Lines and Removing Lines
So now pieces for the most part have motion and collide right. I had created some tests during this development that “precreate” the DeadGrid with blocks. For example, the game starts with 4 lines on the field etc. This was handy for testing and I kept the tests commented so I could turn them on or off.
So I could pile up lines but now how was I going to remove them? A player completes a line only when it hits the DeadGrid and when they drop a piece etc. Ok. So I created this method called copyToGrid(). It’s very long and does many things. But in psuedocode, here’s the gist of the Tetris line removing algorithm.
- Method is: void copyToGrid()
- First, get a temp copy of the current piece to test with
- Then, remember which rows the piece is in (which rows are affected)
- Mark filled rows (done rows) into doneRows array
- Now we remove rows if there are any to be done
- Copy rows to new array, skipping rows that are done, this creates a grid without completed rows, called trimmedGrid
- Copy trimmedGrid to new grid called compressedGrid (not compressed yet, to be compressed). Compressed meaning, empty lines removed, game field remove of empty space.
- Look for nonEmpty lines and remember them
- if empty, check that the row is one that we cleared (in rowsAffected). There are lots of empty rows at the top of the screen usually, we just need the empties that we just cleared.
- Loop through all nonEmptyRowNums and emptyRows.
- If nonEmptyRowNum < emptyRowNum then add 1 to “need to fall” for that row.
- Loop through non empty rows
- There is one row below us, add 1 to “need to fall” for this row. When this is done, we’ll have a hashmap called “needToFall” that has a line number and a number of lines to fall. After this it’s easy.
- Loop through our needToFall map and make them fall by rows stored. Making them fall is accomplished by copying the row above and deleting it.
- compressedGrid is now flattened and removed of done rows
So essentially it goes like this. Let’s say a straight IPiece drops into a slot that clears 2 lines at once near the bottom of the screen. But there is a pile of random crap on top and on one line at the bottom. No blocks should remain on the play field except for the garbage remaining. copyToGrid() would mark the last four rows affected and as done. doneRows is length of four. The DeadGrid is copied to a new grid called trimmedGrid, skipping the last four rows. So trimmedGrid is now a floating line 5. An copy of trimmedGrid is created called compressedGrid but it’s not compressed yet. We loop through all the lines and remember lines that aren’t done. We also remember which rows are empty around the rows affected. This is because those rows don’t need to fall. They are the reason other lines are falling.
Then create a needToFall hashmap that is a map of gaps pretty much. With this needToFall map, we just need to loop through our grid and make each line that is above the needToFall line, fall by the distance stored in the map. This whole alogithm is complex because of how lines can be cleared. Take the following example:
Here’s a deadGrid state. There’s a potential (if you drop a long piece) to clear two lines at once. But there’s a lot of garbage around the lines. This is a tricky use case to handle which is why the algorithm was hard to figure out and develop.
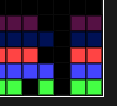
If you drop an IPiece in this grid, it looks like this:
First, any row number that is less another row means above. 5 is greatest so it’s on the bottom. If nonEmptyRowNum < emptyRowNum then add 1 to “need to fall” for that row. You can see that row 1 needs to fall 2 lines. Programically, 1 < 2 && 1 < 4. Row 3 < 4 only.
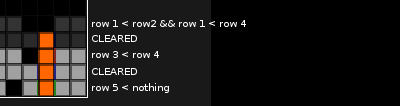
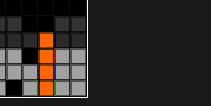
The needToFall map would contain the following values:
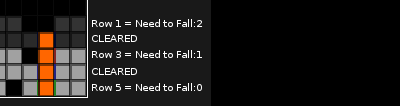
With the needToFall map in hand, it’s easy to loop through the grid and make the falling happen.

Then the piece blocks are copied to the DeadGrid.

Then a new piece is created and the game continues.
The Options Menu
To create a pause type in-game options menu, first I created a new game state called MenuState. In this class I handled key events and drawing to navigate through a menu. This wasn’t too bad but I spent a lot of time adding a bit of polish to it. I wanted to overlay the menu on top of a blurred or faded game screen so the player could see the game behind the options. So I figured out how to make a screenshot in processing and had to add a get() method to my PlayState object. The get() method returns an array of pixels and then MenuState can ask PlayState for its screenshot. Then it’s just a matter of blurring the image, dimming it with a color trick and displaying this image first before painting the menu on top of it. It turned out really neat and I was excited to get that polish working.
Navigation of the menu is handled by capturing the keystrokes in the main loop and delegating them to the current game state (just like the main game state). In this case, UP moves the selection box up and DOWN moves the selection box down. Enter and RIGHT select the menu. UP, DOWN, RIGHT are all mapped to the arrow keys by default. I tried to pick the defaults that seemed the most natural.
ESC brings up the menu but also exits the menu and moves up the menu selection tree. When the main menu is exited then we need to go back to the game already in progress. This is handled by returning the saved game state. When MenuState is created, it saves PlayState into a local variable. When the menu exits, it returns this state and the game magically resumes. Because all the variables are inside this PlayState object, the score, the position of the piece and even the timing of the game is all preserved and it appears to have resumed seamlessly.
I absolutely loved seeing this state pattern work. I had forever wondered how games transitioned scenes and created save game files. Now I grok it.
The Piece Bag
At this point I had pieces falling, rotating, stacking etc. I next did gameplay feel (where the player has a chance to move a piece at the last second, preventing cheating with “infinite spin”). This also included polishing when a piece sticks and when the timer says a new piece is coming. In reality, it came down to procedural code ordering and some if statements.
Gameplay feel was nice so next I polished it some more with a nicer way of generating random pieces. I read a thread on Quinn’s official forums (a Mac Tetris clone) where they described a better method of getting random pieces detailed on tetrisconcept. It’s simple enough:
- put 7 pieces in a bag
- jumble
- get one
- when empty: create a new bag of 7 pieces
It keeps you from getting too many or too little pieces of a certain type.
import java.util.Random;

public class PieceBag {

  Piece pieceBag[] = new Piece[7];    // a bag of 7 tetris pieces
  int pieceBagI;

  float x;  // piece origin
  float y;  // piece origin

  public PieceBag(float x, float y) {
    this.x = x;
    this.y = y;
    initPieces();
    jumble();
    pieceBagI = 0;
  }

  void initPieces() {
    pieceBag[0] = new LPiece(this.x, this.y);
    pieceBag[1] = new OPiece(this.x, this.y);
    pieceBag[2] = new TPiece(this.x, this.y);
    pieceBag[3] = new SPiece(this.x, this.y);
    pieceBag[4] = new ZPiece(this.x, this.y);
    pieceBag[5] = new IPiece(this.x, this.y);
    pieceBag[6] = new JPiece(this.x, this.y);
  }

  public void jumble() {
    Random rng = new Random();   // i.e., java.util.Random.
        int n = pieceBag.length;        // num of items left to shuffle
        while (n > 1)
        {
            int k = rng.nextInt(n);  // 0 <= k < n.
            n--;                     // n is now the last pertinent index;
            Piece temp = pieceBag[n];     // swap array[n] with array[k]
            pieceBag[n] = pieceBag[k];
            pieceBag[k] = temp;
        }

  }

  // get piece from bag
  public Piece getPiece() {
    // if we are on piece 7 then jumble the bag again
    if (pieceBagI == pieceBag.length) {
      initPieces();
      jumble();
      pieceBagI = 0;
    }

    Piece piece = pieceBag[pieceBagI];
    pieceBagI++;
    return piece;
  }
}
Offscreen Drawing and Performance
At some point when the gameplay was finished and I was testing things, I started seeing opportunities for performance improvement. The gray grid on the black game field was painfully inefficient. Every frame it would iterate width and height and draw the lines each time. So some 50 lines were being drawn when they never move. Perfect time to create a reusable buffer. I had never done this in processing (or at all), I had seen the code in OpenGL but never had a reason to do it. I looked at the docs and found how to create an image on the fly and draw lines into this image object. This image is then displayed once every frame and it’s much easier on the CPU. This is called offscreen drawing (and probably other things).
The grid (and other art) is displayed once on the screen with an offset to the root window. Everything in Tatris is original artwork and no textures are used. So this offscreen drawing is used quite a bit. The game starts up, creates a bunch of image buffers on the fly and then displays those buffers as a bitmap on the screen to make the grid pattern, the score box, the next piece box and so on. The code is very similar to loading an image from disk and displaying it, the only difference is the image is created dynamically when the game loads.
Another performance strategy I used early on was to do the cheapest collision detection first. That way, if a method returns true it skips the most expensive operations. For example if I had two cheap tests called checkLeft and checkRight but also had a very intensive test called checkEverything, I’d order it like this:
//psuedocode
if (!checkLeft()) { return false; }
if (!checkRight()) { return false; }
if (!checkEverything()) { return false; }
Bugs and Versioning
Around this time (I think), bugs continued to pop up with the collision detection. Pieces would go through the floor, pieces would rotate into the stationary blocks on the playfield and all kinds of other weirdness would pop up. I spent a week refactoring and reworking a ton of logic. When bugs started popping up, I created a local git repository for CM control so I could rollback, diff etc. The collision bugs exist primarily because I made the design more difficult (pieces really exist in a 2d space). I solved most things and started working on removing done lines off the field. This turned out to be harder than I thought and I spent 2 days implementing different algorithms for clearing lines. Eventually I got one that was really clean and it worked all the time with all cases. I then did frills like scoring, difficulty and GUI/HUD type graphics stuff.
It was done. And then I emailed it to all my friends. Everyone liked it. People said they played it for 30minutes at a time. Good sign. Some collilsion bugs still happened. So I started working on it again after taking a break.
Unfortunately, the bug was extremely rare. I couldn’t see a pattern or reason for it. But every so often, a piece would just go through another block. So I moved all my code from the .pde / Textmate world to a .java/Eclipse world so I could use the debugger. I created automated tests, fixed logic errors, did cleanup and a crapton of stuff. But now I had a problem. I have the .pde version which does stuff like fill(255) and rect(x,y,etc) and the .java version which does stuff like parent.fill(255) and parent.rect(x,y,etc). Not to mention, logic fixes and more robust tests built in. So how do I version this beast? Do I start a new project and call it “Tetris Eclipse”? So essentially I had a debug fork of sorts; an eclipse based processing project and a vanilla processing project.
I don’t know. I’ve gotten distracted and have done other things since then. I’m creating a semi-interactive Elevator Simulation. I’m learning the iPhone API. I did branch my project in git and check in everything. Git was pretty smart actually, it knew that I had renamed my files .pde to .java (it can recognize that it’s the same source even with changes). The CM tangle just kinda scared me off and I deleted the branch. As of right now, the code is versioned and works as far as the version that I sent off (I tagged it as 0.3).
Update: 0.3.1 has the collision detection bug fixed. It was a procedural ordering bug. When someone presses the space bar at the exact moment the active piece drops one line, it pushes the piece too far down. I just reordered that part of the game loop and it hasn’t happened again. Finding this bug was both lucky and annoying because it was so damn rare.
There are 2 types of code (according to the Stack Overflow podcast:
Spolsky: Well, I think everybody feels that way, and that is actually true that there is - there’s kind of two levels of code: there’s the level where it runs and it’s debugged and you’re kinda happy with it and you can continue to work on it if you need to. Let’s say there’s three levels, that’s the middle level. The bad level is you know it’s bad and it’s a pain to work on and any time you want to change something you know you’re going to be pulling out your own hair, and then the top level is like you could publish this in a book because after you got it working you went over it and refactored it seventeen times and cleaned it up and did all kinds of extra work that didn’t get you any extra functionality, but did make it code that anybody could dive into, so maybe you’ve renamed things, you’ve cleaned things up, you’ve reorganized things several times, you’ve gone through the code trying to make it like literary code where the comments just smoothly, seamlessly flow with the code so you can figure out what’s going on.
Well I classify this project as a mix between what Joel Spolsky says is “bad” and “middle”. Because I’m not done with it, I don’t want to remove all the comments and code blocks that are there. There are tests and debug statements in there. There are parts that are very ugly to read. But there there are completed parts that are extremely clean and I wouldn’t be ashamed of. In fact, I think the Game State pattern I did is very slick and extensible. I’d have no problem adding a splash loading screen or some new “scene”. But because I still need to do things, I can’t clean-up or refactor yet. Which brings me to the TODO list.
TODO
There’s a ton of stuff still left as TODO: comments around but outside of those syntax and code level tasks, there’s only a few things I’d like to do before declaring it 1.0 or what-not:
- Sound Effects - I want to record some bleeps and beeps from my analog modeling synth and put them in the game. Put some ambient music in there. Sound will be off by default because I think game sound is annoying most of the time. This is technically easy but artistically tricky because my standards are very high with sound choices.
- Refactor the grid - So pieces exist as real 2D space (vs the easy way in Drawing a Piece on Page 1). Yeah, it’s neat and hard but it’s caused horrible bugs. I need to burn it to the ground and make the pieces positionally in a bitmap on the field. There would be no need for collision detection and the whole thing would be much more efficient. All the other work could be used in another project like a platformer or side scroller; something with actual smooth animation and not the jerky tetris movement where it’s actually not necessary.
- Start with a menu - The game starts right away. This is easy to fix.
So that was the 4-6 weeks of vacation that I burned learning a ton of stuff about gamedev. I did other things like jogging, music, quit WoW and got a bunch of yearly appointments out of the way. But nothing was as memorable as working on Tetris. The most important lesson of all that I learned is the value of taking a vacation for learning (sabbatical? geekcation?). It’s now on my required life list of things to do from time to time. Because I cannot overstress the value of contiguous blocks of time. It’s solid gold. Solid. Gold.