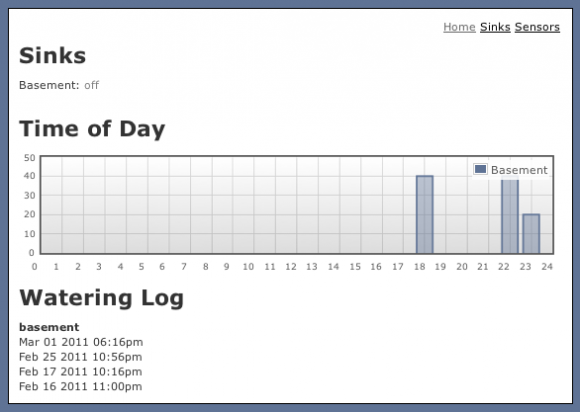
I built a robot arm for my cat during a month-long geekcation. :) Here are some shots of the web interface. The graph shows the percentage of the day that she drinks.
Background
My cat likes to drink fresh and cold water directly from the faucet. We get up and turn on the faucet only to leave it running after she’s jumped down. It’s not really a big problem for us but I saw a fun problem that I could work on. As much as this seems like a weird and freakish oddity, it’s a potential start of a smarthome sensor network that may provide some utility. I also saw an opportunity to learn various things such as MongoDB, mechanical construction with Microrax, Rails3 and more development on Arduino with an Xbee module.
Some informal goals I had in mind when starting the project:
- Extensible - Something where I can add new sensors of any time of function. Say I want an ambient temperature history. Sure a SQL schema can be designed to be extensible and flexible but I wanted something super generic like a big hashtable
- Analysis - I wanted to know what hour of the day my cat drinks the most.
- Control - I wanted a protocol coming from the Arduino that would be flexible enough to not only collect metrics but also accept commands.
- Temporary - Any installation had to be easily undone. No holes in the wall, no new pipes and nothing I can’t undo.
Video and detail past the break.
Here’s a video of it in action for the first time.
Design
I spent some time drawing sketches first of the physical problem. I drew a sink and sketched out some frames around it. I sketched out the angles and vectors in play. I played with the sink handle and tried to break down the physical forces and simplify it to it’s most basic components. I built a small wooden sink faucet with the same dimensions as my real one so I wouldn’t have to work in the bathroom. I took some reference pictures and looked through my sparkfun parts box to see what components I had lying around.
I eventually came up with a small box built around a base platform that would hold both an IR sensor and a servo. From my wooden sink mock up, I knew that the servo’s fulcrum would have to be directly over the handle’s fulcrum. Anything else would cause sliding or rubbing which would lead to more difficult mechanical problems. That meant that I needed something pretty fancy and precise in terms of a support structure. I couldn’t just cut up some wood and nail it together. I would later solve this problem with the microrax structure, but I didn’t know that yet.
Early prototype and testing
I built some pretty rough prototypes using the wood faucet and handle. I first started out by playing with the IR sensor. I figured out a way to smooth the input values coming from the sensor and create a range window which could equate to “cat detected”. I saved that bit of code off to the side and moved on to playing with the servo. This was pretty simple to begin with, using the built-in Arduino library, you just create a Servo instance and write an angle to it. The angle greatly depends on where and how you attach the servo gear so the exact values have to be calibrated for your physical install. In any event, the code to move a servo looks like this:
Servo servo;  // create servo object to control a servo
// attaches the servo on pin 9 to the servo object
servo.attach(9);
servo.write(180); // turns servo to angle 180 but this has to be calibrated
// sink is on at this point
It’s a little more complicated than this (I have the code posted in full) but the idea is pretty simple. The servo library writes a value as a resistance to the data pin running to the servo and the servo moves. The servo requires a bit of time to actually move the arm so you have to put a delay() in. Also, there’s some jitter and debouncing issues you have to consider, like if the servo can’t get to it’s destination then it’s going to buzz (this was a major problem for me). As I’ll talk about later, the code in practice doesn’t just work, you have to play with it and calibrate it until it works the way you want in the physical world.
So at this point, I had a servo that would move 90 degrees on and off when I put my hand (representing the cat) in front of the IR sensor. I was moving a pencil attached to the servo gear that was representing a handle. Later I’d realize that I didn’t need to move a full 90 degrees because all I needed was a small stream of water (with about 10 degrees of movement). There were many other things to do but this was a good first prototype. I combined all my IR and servo code together and saved it off to the side.
Microrax Frame
I needed some way to hover the servo directly over my sink handle. I needed a mount for the IR sensor. I needed something to either put on the sink, or on the wall or something. I considered many options but I eventually found an erector set type product called Microrax. I ordered a basic starter set with 6 pieces of the piping. I figured I’d screw up quite a bit of it so I ordered extra lengths. Suprisingly, after it arrived, I didn’t screw up any lengths of it and the whole experience with Microrax was fun as hell.
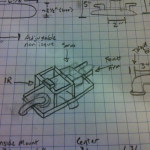
Microrax lets you create almost any object you can think of, as long as it’s 45 or 90 degree angles. Maybe there are other configurations that are possible but the easiest ones are the structures like they have pictured on their website and the structures I have pictured here. I also ordered a servo bracket which fit perfectly on a Microrax pipe piece. I drew up some rough 3D sketches on graph paper. You can see the final one to the right.
From this 3d sketch, I could count how many lengths and pieces I needed to make the frame. So I made a parts list for myself. It was pretty funny making a parts list like a BOM but it was very necessary. I had planning-me and then there was hacksaw-me. Hacksaw-me didn’t care about the plan, he was there to cut. So it was good to review the segment lengths on paper a few times to make sure I wasn’t ruining my Microrax parts.
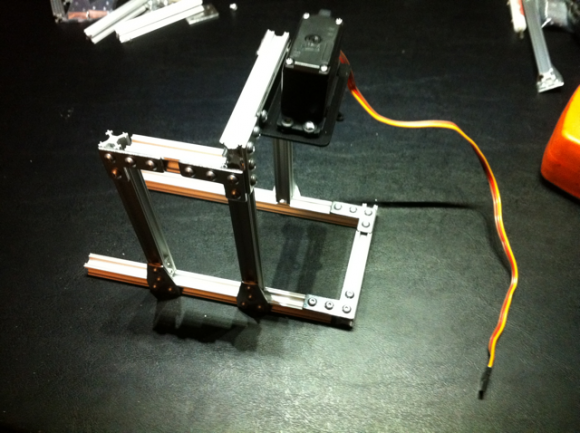
After I had a rough design, I cut out the pieces for the base of the frame and put together the base. I then double checked my lengths by putting it on the sink, also to visualize the rest of the pieces. There were some definite anchoring problems that I was trying to solve because I knew that when the servo pushed on the sink handle, it would push back on the frame and I didn’t want the frame to move.
 I cut the rest of the pieces and eventually got a frame that placed the servo directly over the sink handle fulcrum which is exactly what I wanted. You can see here (to the right) I’m illustrating that the servo gear is directly over the handle pivot point. My screwdriver isn’t exactly pointing on the pivot point, it’s just there for depth reference.
My frame was built and I attached a servo bracket to it. At this point I actually ran out of parts. So I ordered some more and scavenged microrax pipes from other parts of the frame.
Arm and grip

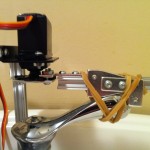
But now I needed to attach an arm to the handle. The servo attachment is just a little plastic star-shaped gear and I had to somehow attach that to a microrax piece. I sandwiched two plates together and eventually got this little piece you see here. The hole on the black star is where the servo gear threads go. A screw goes through this and holds this servo sandwich piece in and keeps it from falling in the sink. This star piece attaches to a Microrax piece that acts as the arm. I simply made a 90 degree downward post that acts as fingers off the arm. A lot of this I modeled just by using my real hand on the faucet and trying to reduce the mechanics as much as possible.
I tried a few variables on a grip (you can see the rubber band attempt). I even tried velcro and some other weird ideas. But the servo wasn’t transferring enough force to the handle, or at least seemed like it could be doing better. Also a lot of calibration came when I went to actually attach the grip. If you do anything that is physically or deployed, make sure you have some wiggle room to adjust to your target. Coming from a software world, I was horrified at how imprecise this is. Automatic deployment like capistrano, chef and other tools obviously have no relevancy here in the physical/hardware world.
 Anyway, pontifications aside, the rubber band connection around the handle instead of a hand-life device was transferring too much power to the inner portion of the lever. That wasn’t good.
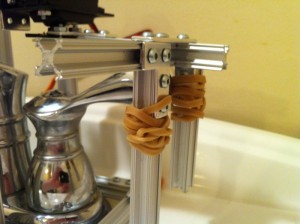
I eventually realized that the most torque I could get was to push at the outer point on the handle (ie: a lever). So I positioned the grip so that it would squeeze all the way at the tip of the sink handle. This allowed the servo to easily and smoothly turn the handle. I put some rubber bands the pieces to give the arm some grippiness and it has worked very consistently for months. This is the grip I settled on. Some of the pieces need to be trimmed up but you get the idea.
Rig Polish
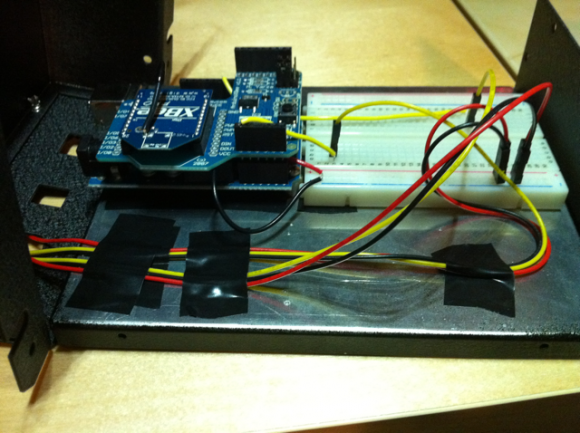
So at this point, my arm was gripping the handle and my code was turning on the faucet. That pretty much finished up the hardware portion of the prototype. After that, it was just polish and finish. I got a box from sparkfun to mount the Arduino in and I wired it all up under the sink. I made wire connectors that go to servo extension cables that make the box easy to unplug from the servo and IR hookups. The wires go down the back of the sink to this box which is holding the Arduino and the Xbee shield.
Software Components
Before talking about the software components, here’s an overview of how everything works together.
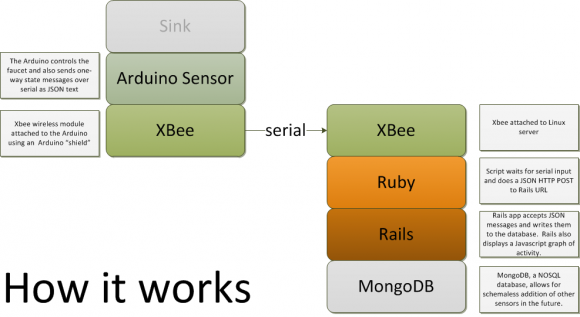
So let’s start off by talking about the Xbee component that’s attached to the Arduino.
Xbee Integration
I played around with the usb-serial driver using an Xbee explorer and integrated some code that would print to serial instead of printing to console from the Arduino. This would allow me to send a message from the sink to a full-on computer with a proper software stack to do something interesting. In my case, I wanted to send a message when the sink is tripped. I made up a little protocol based on JSON for the message. The Arduino can’t really do JSON per se but it can send plain-text that looks like it. This is what my Arduino sends over Xbee when the cat jumps up into the sink:
// example JSON message
{
  "sensor": "sinks",
  "name": "basement",
  "proximity": "true",
  "running": "true",
  "hash": "82C61D54A77D6A90219E4E40CE6C8440",
  "type": "metric"
}
Proximity is a bit redundant but I put it in there because the Arduino actually knows proximity before it knows running (debouncing) so in the future, I could have it send a message on every proximity event.
The hash is actually computed on the Arduino using an MD5 library. This was a b*tch to get working. I’d actually drop this functionality right away if I did this over. All it does is hash the sensor value and the name value together as a checksum. I didn’t know how good the Xbee would be. Definitely overengineered this but I was following serial advice I read on the Arduino forums. Almost every serial protocol has a checksum or sanity mechanism.
Ruby Serial Bridge AKA: The Cat Bridge
So on the other side of the Xbee link is a Linux box that is running a do-forever ruby script. It has an Xbee Explorer USB dongle and it watches for valid JSON coming in. I’m cheating quite a bit on reading the serial and this part could be toughened up against garbage data. I just look for opening and closing braces (meh).
Regardless of fragility, when a message comes in, it does a bit of sanity checking to make sure the message is valid. If it is valid, it does an HTTP POST and passes the JSON message along, stripping the hash key. The MD5 hash is just used for serial, TCP should handle error correction in a real software stack.
Here’s the function that posts to rails.
# do JSON HTTP post to rails
def post_json(url, input_json)
  # we don't need the serial hash anymore so we
  # can reuse the serial json payload from the sensor
  input_json.delete "hash"
  # parse our input url
  uri = URI.parse(url)
  # make a new request
  req = Net::HTTP::Post.new(uri.path, initheader = {'Content-Type' =>'application/json'})
  # have to format it as json again with .to_json to avoid a
  #   undefined method 'bytesize' for #<Hash: ...
  # error message.
  req.body = input_json.to_json
  response = Net::HTTP.new(uri.host, uri.port).start {|http| http.request(req)}
  puts "Response #{response.code} #{response.message}: #{response.body}"
end
When it goes through, you see this on the console.
VALID: <metric>, proximity:0 running:false
Posting to http://localhost:3000/sinks/ -->
{"sensor"=>"sinks", "name"=>"basement",
  "proximity"=>"0", "running"=>"false", "type"=>"metric"}
Response 200 OK : mapped json_request.
The response message “mapped json_request” is coming from a Rails action which I’ll talk about next.
Rails and MongoDB
The rails app was pretty straight-forward. I played around with MongoDB and the Mongoid gem (for ORM) for a few days, making some sample projects and reading up about document design (vs schema design). I’m not an expert on MongoDB but I got enough working to starting loading data in.
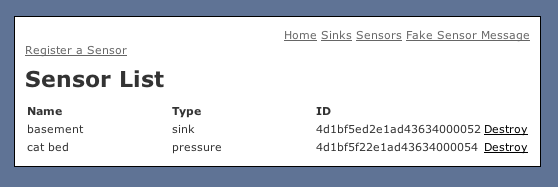
I created a sensor registration page and model where I identify sensors by name, ie: “sink”. And then the json post updates the values for that sensor name and type. I should really use IDs as keys but this is pretty easy and flexible to just use names.
The interesting part was flipping on versioning in the Mongoid gem. This gave me automatic versioning on historical states of the sink. With this enabled, I could make a graph summarizing what hours the cat drinks the most (or whatever report). Versioning is dead simple to enable but later it would turn tricky to work with because the queries are very different in MongoDB vs a SQL database.
My model with versioning looks like this:
class Sink
  include Mongoid::Document
  include Mongoid::Timestamps
  include Mongoid::Versioning

  validates_uniqueness_of :name
  field :running, :type => Boolean
  field :proximity, :type => Boolean
  field :collected_at, :type => Time

  def plot_by_hours
    hours_hash = Hash.new(0)

    # count up our hours
    self.versions.each do |v|
      # we only care about when the sink is running to count cat drinking
      if v.running == true
        hours_hash[v.collected_at.hour] += 1
      end
    end

    hours_hash[self.collected_at.hour] += 1
    total = 0
    hours_hash.each_key do |h|
      total += hours_hash[h]
    end

    hours_percentage = Hash.new
    hours_hash.each_key do |h|
      percent = hours_hash[h].to_f / total.to_f
      hours_percentage[h] = (percent.round 2) * 100
    end

    # flot needs an array of arrays for data values
    hours_percentage.to_a
  end

end
The plot_by_hours method returns an array of of values that represents how many times the sink was tripped per hour.
  > Sink.first.plot_by_hours
 => [[23, 20.0], [22, 40.0], [18, 40.0]]
All this was enough to get a basic interface up and make a graph with flot.
Certainly there’s a ton of refactoring that could be done (if you look at the code especially). First, naming the model “Sink” is sort of stupid. It should be called “Sensor” or something like that. Second, I should not use font color tags because those are going away. Lastly, I should move the do-forever cat bridge serial monitor thing into a God process or something else that starts and ends with rails. But that would couple it to the webserver.
Development Problems
While building this whole thing, I ran into some places where I got stuck.
Servo buzzing
The biggest problem I had was getting the servo under control. The servo would buzz when moving to a position because the resistance of the handle would not let it get completely to the target position. For example: 90 is off and 180 is on. It would try to turn off but get to 91. At 91, it buzzes but it’s not moving enough to get to 90. I solved this by jerking to 20 and then moving to 70,80 and then 90. Seemed to work but then the microrax rig would eventually de-calibrate my fine tuning. I was not happy about this and it wasn’t very elegant. I tried many times simply to turn off the servo when it was done moving but many attempts would cause the servo to completely reset itself which would jerk the handle violently as it went back to position 0 and then to 90 (or 180 whatever). For a long time I didn’t think turning off the servo was actually possible. I thought the Arduino servo library was either buggy or incapable of doing what I wanted. I kept playing with it and I really don’t know exactly how but I managed to get a bit of working code that did turn off the servo after moving. This way, I don’t need to jerk to 91,70,80 or anything else weird. I just move, turn off. The snippet of relevant code for turning off an Arduino servo is below:
// full code available, this is just an excerpt
void setup() {
  // attaches the servo on pin 9 to the servo object
  servo.attach(9);
}
// do forever loop
void draw() {
  // if cat detected, move faucet to on
  servo.attach(9);  // reattach
  servo.write(105);  // or whatever angle
  servo.detach();  // this would jerk/spaz the servo out
  ....

  // cat is gone, move faucet to off
  servo.attach(9);  // reattach
  servo.write(85);  // or whatever angle for off
  servo.detach();  // this would jerk/spaz the servo out
  }
The important thing to get out of the code here is that the servo detaches after moving and only reattaches when it needs to move. This is way better than just moving and staying attached because it won’t buzz if it doesn’t reach its destination.
Frame torque
Torque on the faucet handle was a problem. When the faucet would turn on, the opposite force would torque the frame. I had to “anchor” it with some hobby putty. A better solution would be to clamp it down but I didn’t have a lot of lip around my sink to do that.
Flot
Flot is what I used to draw the graph. It’s a client-side javascript graphing library. Flot is nice but it gave me a lot of trouble trying to figure out exactly what format it needed the data coming from the rails webservice to return. I had to play with this a lot and sometimes it would silently die (like javascript likes to do). I was using Chrome to test but I switched to Firefox with Firebug to help catch the javascript errors. Getting the javascript data from the rails app (really from the DB) to the jQuery graph was a pain. I got stuck on this for at least a week. But flot is really cool. No imagemagick problems.
Deployment Problems
After getting ready for “deployment” (where I wanted to take my code from my laptop and put it on my home Linux box), I found that Ubuntu was really out of date on my server. So I ran a bunch of `do dist-upgrade’ commands on it to update it and that’s when my server’s HDD died. I mean, I guess it’s a logical time for it to die. The dist-upgrade thing lights up the disks pretty good.
Luckily, I had the root disks mirrored so I could get all the data off (not much). The problem was, it’s software raid and it was using mdadm instead of the newer LVM. Compounded by that, it was still running some older version of Ubuntu so I couldn’t just switch to LVM and re-mirror the disks. A bit of an environmental issue but lesson learned, just spring for the 3ware card.
So I ordered a new one and ran into problems there. The box I am using is a Shuttle SFF thing. It was supposed to have graphics on it. Well guess what. You have to buy a CPU with graphics on it (wut). The i5-750 doesn’t have a GPU on it and the Shuttle VGA port is actually just a pass through for the GPU on the CPU. So I had to buy a i5-650 which fixed this problem.
Then I had a virtual console resolution problem. Console mode would boot up at 1680x1050 (way too high a resolution and VGA cable noise). Setting nomodeset fixed it.
Then I had a networking problem. Large secure copies over SSH (or presumably anything) would cause kernel panic with r8169 network driver. I tried moving to 2.6.37-20637rc2 off ubuntu’s ppa site but it would still happen. I wasn’t even past the OS build at this point. I was just trying to copy some files over (not even code) and the box would panic. Awesome. Well, I’m glad I found it early. So eventually I found that the r8169 driver sucks. Everyone said to use the r8168 driver even if that doesn’t match the chip exactly. Apparently the devices are really similar but the drivers are very different in terms of stability. Ok! Yak shaving ho!
This solution worked. It’s pretty lengthy and I’ll save it for another post. There’s some stuff on the web about it. Basically you use dkms to build a module that supposed to be updated everytime you update the kernel. It actually worked pretty well for a while but I had to undo it all because of the next problem.
So I had a working box at this point and I built up all the DBs, loaded code and tools (rails3, rvm, etc). I documented all of the install as I went and made a cheat sheet that’s come in handy ever since (I’ll post it later).
Unforunately, I ran into massive problems with the usb-serial port driver. My bridge script cat_faucet_bridge.rb wouldn’t start because it can’t open /dev/ttyS0 or /dev/ttyUSB0. The new kernel had a problem with the usb-serial driver. So I was stuck. I could either have:
- a box that works with my Arduino but crashes under 90MB of network traffic transfer (or who knows under what load)
- a box that doesn’t work with the Arduino but has a rock-solid network driver
Awesome! Either options are useless because I needed both. I tried building my own kernel from source (which I’ve done many times back in the day) but it was turning out to be a lot of work because of how Ubuntu packages it’s thing and runs grub-update. Also, picking modules can be tricky. I didn’t want to get in my Delorean and be a sysadmin again. So I gave up. Which turned out to be the right solution because another Ubuntu PPA hit (2.6.38-020638rc5-generic) that fixed everything.
False hits
So now the Arduino is running, sending data to the cat bridge which is posting JSON to rails which is storing everything in MongoDB. It works great. Now I can figure out at what hour in the day my cat drinks the most. Except when I wash my hands in the sink and trip the IR sensor. Now I have a MongoDB entry in the versions document that’s a false positive. I need to go into the DB and remove it manually (or add an interface to do this).
My collection looks like this:
{ "_id" : ObjectId("5d5c9d56f2c31e1d0f000001"),
"collected_at" : "Tue Mar 01 2011 18:12:12 GMT-0500 (EST)",
"created_at" : "Wed Feb 16 2011 23:00:23 GMT-0500 (EST)",
"name" : "basement",
"proximity" : false,
"running" : false,
"updated_at" : "Fri Mar 04 2011 19:39:18 GMT-0500 (EST)",
"version" : 5,
"versions" : [
        {
                "version" : 1,
                "collected_at" : "Wed Feb 16 2011 23:00:32 GMT-0500 (EST)",
                "created_at" : "Wed Feb 16 2011 23:00:23 GMT-0500 (EST)",
                "name" : "basement",
                "proximity" : false,
                "running" : false,
                "updated_at" : "Wed Feb 16 2011 23:00:32 GMT-0500 (EST)",
                "_id" : ObjectId("4d6879ddf2c31e2ede000001")
        },
        {
                "version" : 2,
                "collected_at" : "Thu Feb 17 2011 22:16:05 GMT-0500 (EST)",
                "created_at" : "Wed Feb 16 2011 23:00:23 GMT-0500 (EST)",
                "name" : "basement",
                "proximity" : true,
                "running" : true,
                "updated_at" : "Thu Feb 17 2011 22:16:05 GMT-0500 (EST)",
                "_id" : ObjectId("4d6879ddf2c31e2ede000002")
        },
        {
                "collected_at" : "Thu Feb 17 2011 22:16:13 GMT-0500 (EST)",
                "created_at" : "Wed Feb 16 2011 23:00:23 GMT-0500 (EST)",
                "name" : "basement",
                "proximity" : false,
                "running" : false,
                "updated_at" : "Thu Feb 17 2011 22:16:13 GMT-0500 (EST)",
                "version" : 3,
                "_id" : ObjectId("4d6879ddf2c31e2ede000003")
        },
        {
                "collected_at" : "Fri Feb 25 2011 22:56:13 GMT-0500 (EST)",
                "created_at" : "Wed Feb 16 2011 23:00:23 GMT-0500 (EST)",
                "name" : "basement",
                "proximity" : true,
                "running" : true,
                "updated_at" : "Fri Feb 25 2011 22:56:13 GMT-0500 (EST)",
                "version" : 4,
                "_id" : ObjectId("4d6879e4f2c31e2ede000004")
        }
        ...
So let’s say that I just tripped the sink. The sink has a versions[] nested document because Mongoid has its versioning feature set to on. Version 2 has a running:true attribute, Version 3 has running:false and the current version (5) is false. That means the sink started off, turned on (by a cat) and turned off. Then I accidentally turned it on (version 4). I only graph and care about running:true because I’m graphing what hour the sink turns on. So all I have to do is rollback the version in the versions embedded document.
Well it’s not that easy on the command line. First of all, I really want to pop off a version and substitute the current version with what I popped off the versions[] array. I don’t know how to do that in the mongo shell. Maybe it’s possible. I can explain (however temporary) how I fix problems like this until I do it in the ORM layer (Mongoid) and build a proper UI around it.
First, make a backup. MongoDB is unforgiving. The command mongodump -d database_name -o /tmp will dump a binary dump that is not plain-text like mysqldump (unfortunately). I was able to drop and re-import a collection like this:
// drop the collection I just eff'd up in the mongo shell
> db.mycollection.remove();
# now I can restore my collection from the Unix shell
$ mongorestore -d database_name -c mycollection /tmp/database_name/mycollection.bsonOf course there are many options other than this. But now that I have some confidence in messing with my data directly, so I updated the false positive. To do this, I need to delete 2 versions from my versions[] embedded document and possibly update the current document’s date. I don’t always need to update the data (if it’s running:false I don’t care) but I thought I’d mention how to do it anyway.
// rollback the current document's date, replace the string in new Date() with a timestamp
db.sinks.update( { _id:ObjectId("5d5c9d56f2c31e1d0f000001") },
{$set: {'collected_at' : new Date("Tue Mar 01 2011 18:12:12 GMT-0500 (EST)") }});
// delete versions, sets to nulls
db.sinks.update( { _id:ObjectId("5d5c9d56f2c31e1d0f000001") }, {$unset: {'versions.3':1}});
db.sinks.update( { _id:ObjectId("5d5c9d56f2c31e1d0f000001") }, {$unset: {'versions.4':1}});
Lessons Learned
- The Arduino has very little memory and is annoying to code on. This is because I’m used to rapid high level languages and embedded C is very far away from that. I’m not trolling, it was really annoying when doing simple MD5 things took a night or two. There’s also memory problems and when things crash they crash hard with no exception handling. My best advice is to try to get your problems off the Arduino as soon as possible.
- The adjustable nature of Microrax means you don’t have to be 1/16” accurate on your hacksaw skills. This is nice.
- If you build something intricate with Microrax, order lots of extra bolts, back-plates and joint pieces. The lengths of aluminum channels don’t go quick but the joint pieces do.
- Servo torque changes depending on the voltage given.
- Installation is a bit tricky. Don’t be afraid to change your design.
- Calibration of the physical space is key. Environmental and slight adjustments will be necessary unless you have many, many safeguards and overlapping functionality.
- Iterate, iterate, iterate.
- Don’t over-engineer. Check your assumptions with simple tests.
The Biggest Lesson
The biggest thing I learned from all this is how a project like this resonates with people more than software. When a friend would come over, it was a more interesting presentation because of the physical component versus just a pure software demo.