
We are in the home-stretch now. Let’s show a few more details and then we’ll run the whole thing and show that it works.
This post is part 3 of a series. We are learning networking by building a network.
- Part 1 - covered networking basics and implemented MAC addressing
- Part 2 - implemented primitives like IP, ARP and an Interface
More Abstractions
In part 2, we created an interface and previewed how we can make “a box” at the end of the post. A box is just slang for a server, a node or a computer. There are many ways we could represent a box, but one way would be for it to own the things that it owns in the real world. Since we will not model an entire operating system here, this is just an approximation.
The Server
A box (or server) owns its hostname, has an interface and an ARP table.
pub struct Server {
  pub hostname: String,
  pub interface: Interface, // for now, one interface
  routes: Vec<Route>,       // routing table, not implemented
  pub arp_table: arp_cache::ArpCache,
}
It also owns its routing table as routes. But the routes part of a server is not implemented here because we never made a router. There is also a major gap in how an ICMP reply would be handled. In the real world, there would be a network stack listening that would generate a response. This is not implemented.
The Switch
pub struct Switch {
  ports: HashMap<u8, port::Port>,
  link_lights: HashMap<u8, bool>,
  cam_table: HashMap<MacAddress, u8>, // MAC to port number
}
The interesting part of the Switch is the cam_table. This functions the same as the arp_table that the Server has, except it tracks what ports have what MAC addresses. When a real switch is turned on, it doesn’t have any knowledge of who is physically in what port. This is going to be faked by a plug_in_interface function which knows this but on a real switch this information would be observed or be done by flooding all ports and watching who responds.
The switch contains ports. This would be layer 1. The cable and electrons are not modeled except for a message on the Port which prints out a "Sending frame out on port with MAC: {:02X?}" line. The simulation stops here. To continue the simulation, we could model the cable or connection to the server and send the packet along with whatever is connected to this port. But it doesn’t do that.
The Main
Time to run the simulation. Let’s walk through the main.
fn main() {
    // Let's say that a server `box1` pings `box2`.

    // We need to set up our network "by hand"
    let mut switch = switch::Switch::new();

    let box1_interface = server::interface::Interface::new(
        "11:12:13:14:15:16",
        "192.168.0.1".to_owned(),
        "255.255.0.0".to_owned(),
        None,
    );
    let mut box1 = Server::new("box1".to_owned(), box1_interface.clone());

    switch.plug_in_interface(1, &box1.interface);

    let box2_interface = server::interface::Interface::new(
        "21:22:23:24:25:26",
        "192.168.0.2".to_owned(),
        "255.255.0.0".to_owned(),
        None,
    );
    let box2 = Server::new("box2".to_owned(), box2_interface.clone());

    switch.plug_in_interface(2, &box2.interface);
This part above basically sets up our network. This is like going to the computer store and buying two computers, one switch and some cables. It also represents installing an operating system and assigning IPs. Notice that our IP addressing and MAC names are still the same from Part 2:
box1 will have the IP address of 192.168.0.1 and the MAC of 11:12:13:14:15:16
box2 will have the IP address of 192.168.0.2 and the MAC of 21:22:23:24:25:26
Notice switch.plug_in_interface(2, &box2.interface); takes the port number as the first argument. This is more readable in code with type hints on because the function hint would look like this:
plug_in_interface(&mut self, port_number: u8, interface: &Interface)
And then later on in plug_in_interface, there is a self.cam_table.insert(interface.mac, port_number); call. So, plugging in a port cheats by remembering the port number in the cam_table.
Then we have more “cheating” because we need to model a hosts file or DNS.
    // box1 calls getbyhostname(box2) which is simulated here
    let hosts_file = make_hosts_file();
And each box’s IP is saved as variables box1_host and box2_host (not shown for brevity). The function make_hosts_file is hardcoded as a helper function in main.
    // box1's IP stack figures out that the request is local, not needed to forward to the gateway
    let local_lan = crate::network::ip::same_subnet(
        box1_interface.ip.parse().expect("box1 ip is not an IP"),
        box2_interface.ip.parse().expect("box2 ip is not an IP"),
        box1_interface.subnet_mask.clone(),
    );

    if !local_lan {
        // TODO: routing and routers
        panic!("Routing not implemented.");
    }
This part is basically IP routing as discussed in Part 1. Box 1 and 2 are on the same subnet so local_lan is always true in this demo. This is here to exercise the IP routing feature but there is no other path at the moment. What would happen next is to implement a router and send the IP packet to the router instead of going to layer 2.
We continue instead and make an ICMP packet from the hosts file resolved IPs.
    // box1 crafts an ICMP echo request and IP packet
    let payload = "This is a ping, weee";
    let icmp_packet = icmp::packet(box1_host.ip.to_string(), box2_host.ip.to_string(), payload);
Then, we go to layer 2 and make an ethernet frame.
// Once the IP address of box2 is known, box1 checks its ARP cache.
// now, this is a one-shot simulation program so we will setup this scenario but later we
// might turn this into a long running or concurrent or GUI program where this is situation
// is not pre-determined, but in the meantime ... box1 looks up the MAC address for box2
// using ARP The ARP response is not found so it broadcasts an ARP who-has and gets a
// response box1 adds the response to its ARP cache
let dest_mac = box1
.arp_table
.lookup(&box2_host.ip)
.expect("The demo has gone south because box2 ARP resolution failed");
let ethernet_frame =
network::ethernet::build_ethernet(box1_interface.mac, *dest_mac, icmp_packet);
// uncomment to see the packet and open in wireshark
// write_pcap("ping.pcap", ðernet_frame);
// the packet is sent over ethernet to the switch which has its own MAC table etc
switch.forward_frame(ethernet_frame);
// the entire process is unwound on box2 which will not be covered here for now
}
Finally, the switch would handle layer 1 and the bits would arrive at box 2.
So, when we run this we get output like this.
Interface with MAC: "11:12:13:14:15:16" plugged into port: 1
Interface with MAC: "21:22:23:24:25:26" plugged into port: 2
Sending frame out on port with MAC: [21, 22, 23, 24, 25, 26]
Frame forwarded to MAC: "21:22:23:24:25:26"
But, there is something more interesting we can do. We can dump the Ethernet frame and see if we really are doing “networking”. In the main, there is a write_pcap() function that we can uncomment and it will dump a pcap file at the project root.
If you open this pcap file in Wireshark, it will parse correctly. These are the bits that would hit the modeled ethernet switch, in other words, the cable as bits because this is the frame that is from the message “Sending frame out …” above.
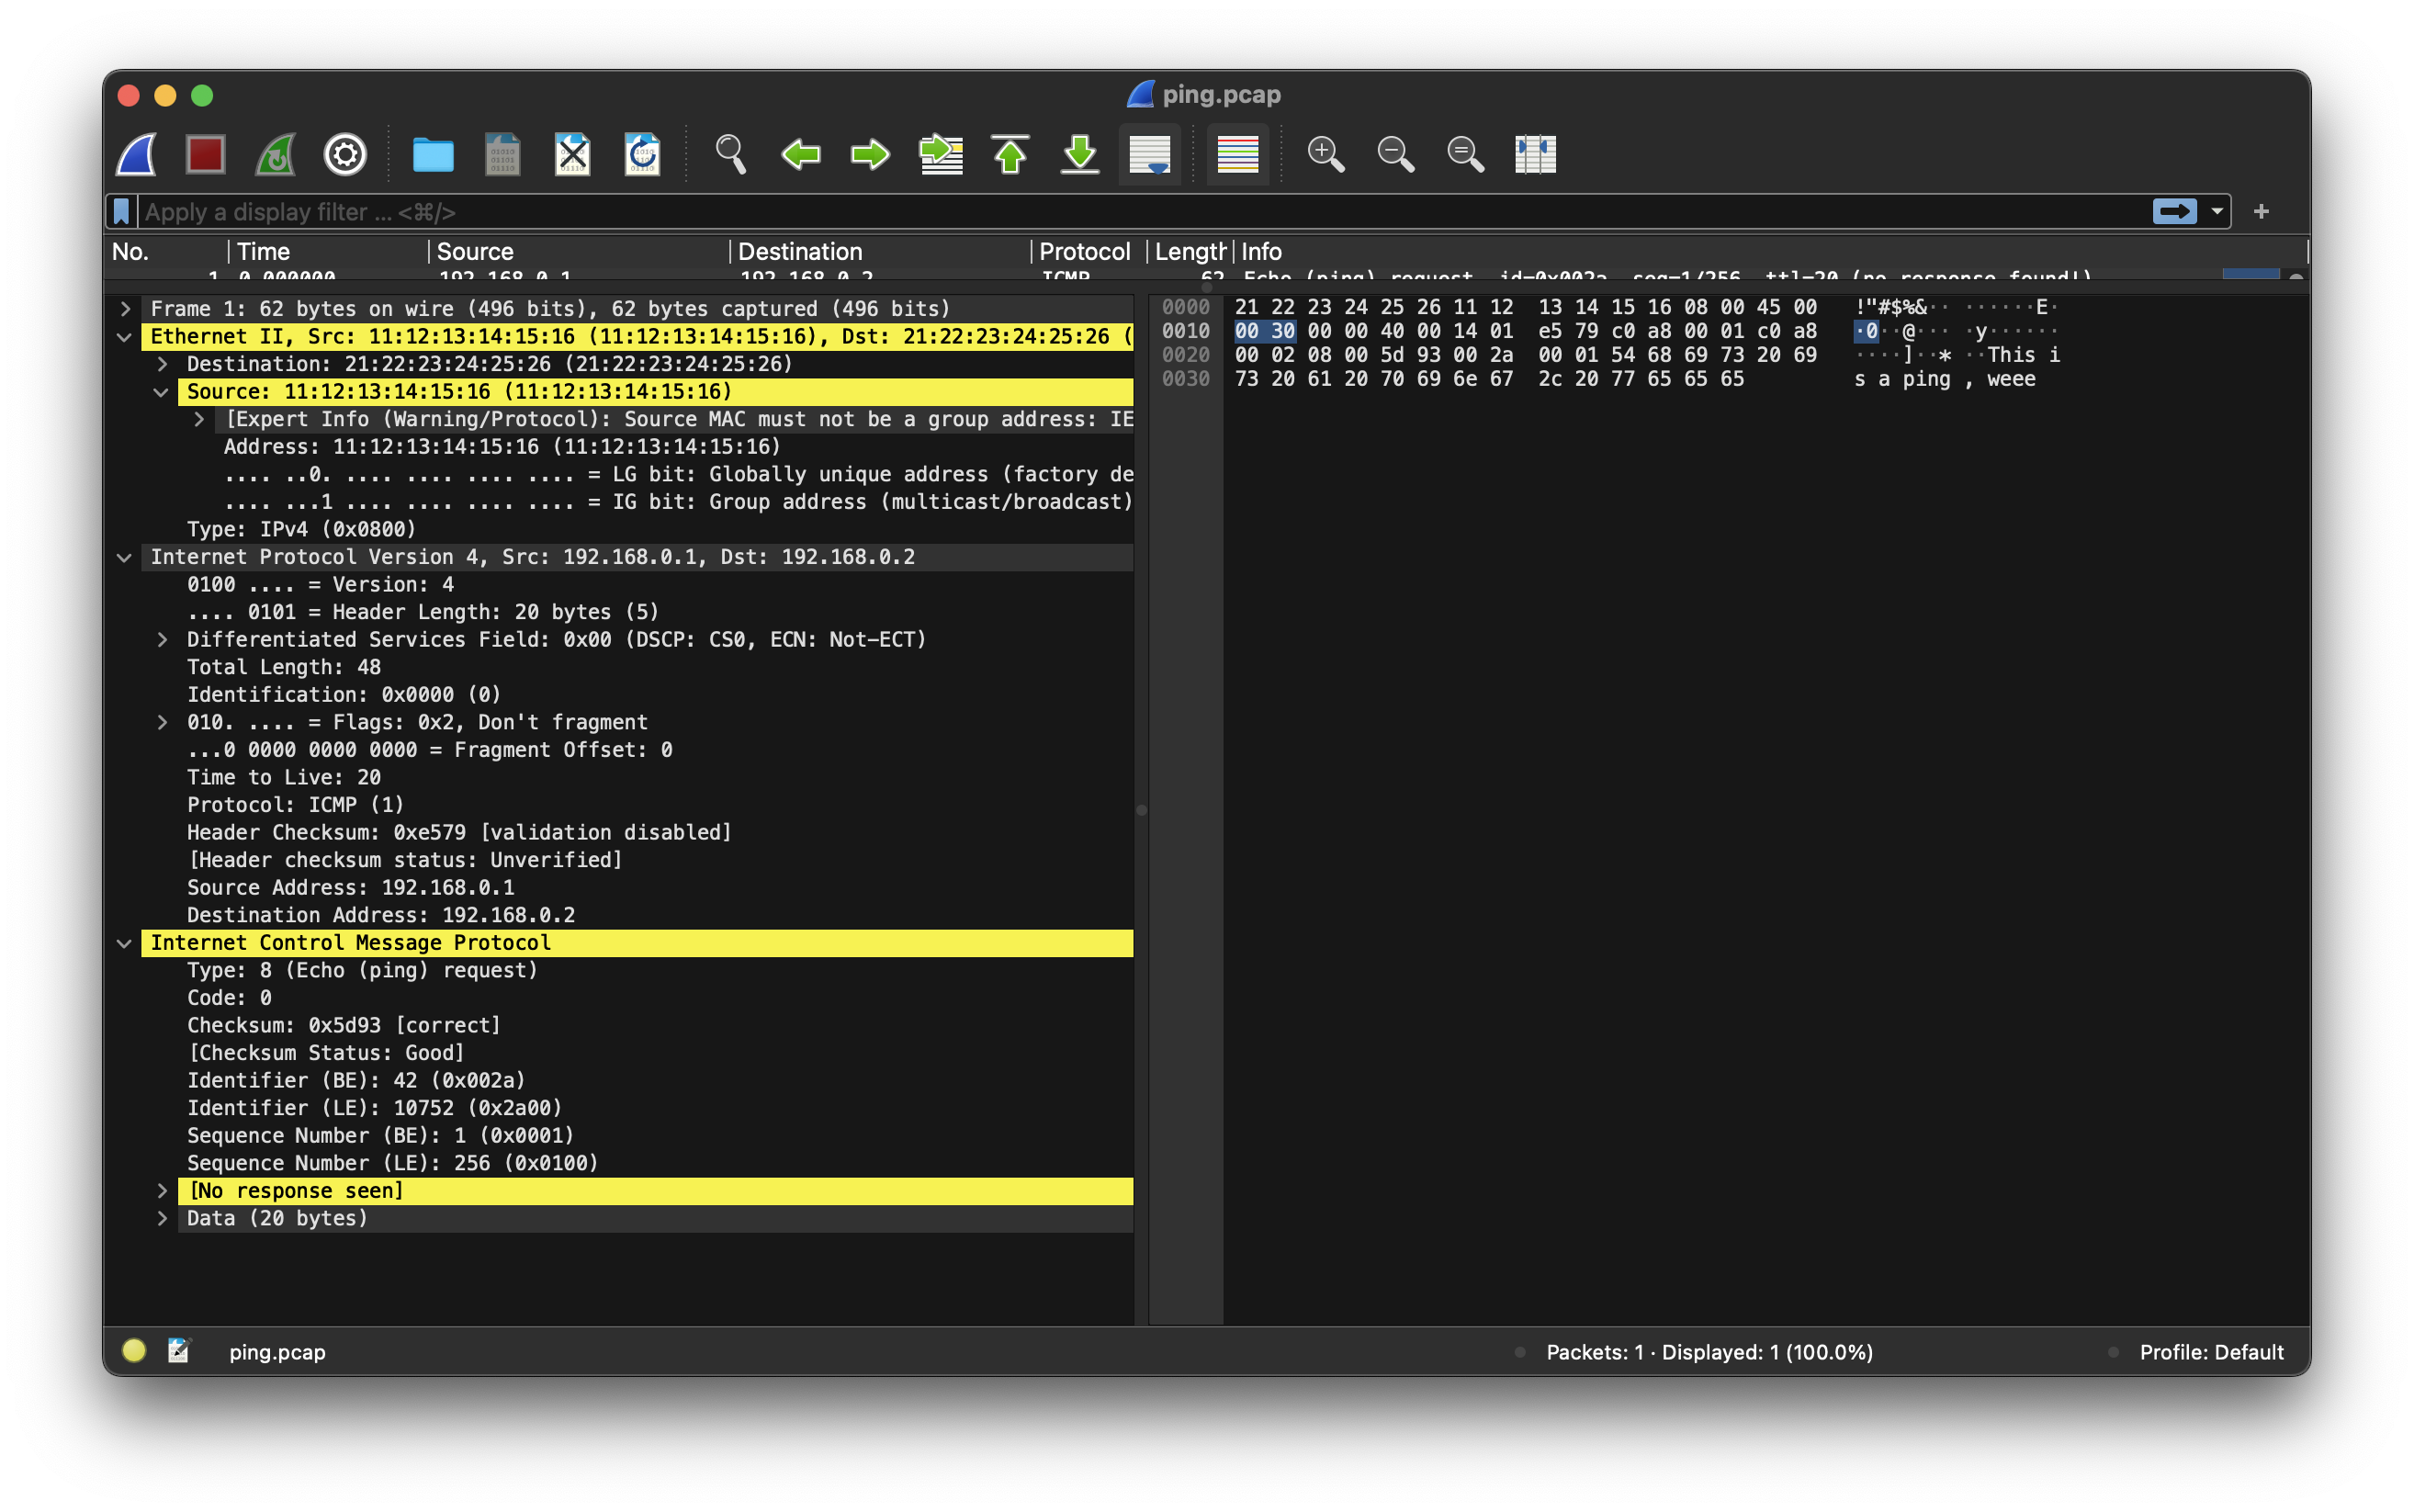
You’ll notice there are two warnings in yellow:
- It doesn’t like the MAC address we made up because it probably breaks spec.
- There isn’t an ICMP reply message seen.
Pretty funny. But otherwise, we see the payload “This is a ping, weee” in the right pane of Wireshark and our source and destination is all there and correct. You can even see the different layers. Ethernet is on top on the left pane, then Internet Protocol and finallly ICMP. These are the networking layers stacked, like envelopes containing envelopes.
The Network is Real
So, that’s a network simulation in Rust. What is fun to think about is that in Wireshark you can replay captured packets on a network. You could create a tun0 address and then send this packet out on a real network. If you had a host with that MAC address and IP then it would be delievered. But even if it didn’t deliver, something else would happen like the switch would ignore it or try to ARP broadcast. Or you could change the simulation to be a MAC and an IP that you really do have.
Seeing our simulated ping in Wireshark is nice visual validation of the simulation we made. We’ve gone from theoretical concepts to tangible output, bridging the gap between code and real-world networking. This experiment has hopefully taken a bit of the mystery out of networking. It did for me. I learned many things from doing all this.
- I did not know how the CAM table worked.
- I had not thought about which pieces went where on a server.
- I had never used the Etherparse library before or generated a packet programmatically.
So, that was fun and I’m glad I got around to making three posts about it. Happy exploring and check out the repo and make it your own or implement something else to learn it. Learning by implementing is not my idea.